Marking Period 1
Log #1 (9/19-20/11)
Today and yesterday I worked primarily on my design brief, specifications and limitations. I had to create a group design brief with all my members and an individual design brief that was specific to my task. After doing that I worked on my specifications. In order to have good specifications I needed to think of all the requirements that had to be met. Once I reviewed my specifications I moved on to my limitations. For my limitations I thought of all the possible limits that were placed on my group members and I. Some include, time, materials and money. Overall, I accomplished basic but crucial tasks needed to complete my project.
Log #2 (9/21-23/11)
During the end of this week I worked on organizing and designing my calendar. I put all the appropriate assignments in their appropriate due dates. I also added some of my own to keep me from having a lazy day. After I designed and filled out my calendar I had a small conference with my group. We discussed the final components of the land challenge. By knowing this we are able to continue on with testing procedures and various written parts of our project. Overall, this week was very successful in getting my project going.
Log #3 (9/27-29/11)
The beginning of the week I accomplished a lot. I revised and edited any problems with my design brief, specifications and limitations. After I completed that, I found a few more pictures for my background information and finally posted it. I also decided to beef up my logs a bit. My first and second logs were very general and not specific to what I did individually. After fixing those I began to work on my testing procedures. Hopefully I will have time at home to finish them and post them. Overall, I had a successful two days and more importantly saved Dustin on the 27th!
Log #4 (10/04-05/11)
The beginning of the week I focused on revising and editing the posts I already made. There were a few problems with some of my posts and these are being fixed as I go along. My background information needed a little more work. I added another paragraph to it and I also reorganized any pictures that went with my background information. Since I haven’t been too concerned with the blog itself, I need to fix a few things up.
Log #5 (10/05-07/11)
The end of this week I worked on alternate solution drawings and how many were needed. At first we thought three alternate solutions for each challenge were needed; this gave us a total of 16. After a bit of talk, we found out that groups were only required to get three in total. My group and I were then instructed to do the drawings, solutions and write-ups for all 16 of the solutions. This would give us a better analysis on our solutions and be able to determine the most optimal one.
Log #6 (10/10-14/11)
This week was a shorter week so I decided to write only one log rather than two. This week I talked with my group members and began to divide the alternate solutions up. We also completed the matrices for determining the most feasible solution for our project. Although many drawings still need to be drawn, we are on the right track and making progress on our 16 drawings.
Log #7 (10/17-21/11)
This week was a very complicated and filled week. I had to complete both my testing procedures and my alternate solutions. Yesterday, I completed my testing procedures that are viable for my solutions for both the aquatic and terrestrial challenges. This past week and today I worked on my alternate solutions. In total, my group has to have 16 orthographic drawings, 16 isometric drawings and any additional detailed drawings. I’m about half way done in completing my drawings and will hopefully finish the rest before Monday. Overall, this week has been more stressful than normal and also very limited on time.
Log #8 (10/24-28/11)
This week was a stressful week for the class. We were required to have our presentations of our project ready for grading. Each student was required to present their blog to the class and the instructors. For me, this went well and I felt pretty confident doing it. There were a few things like the model, brainstorming and pictures of alternate solutions that were not found on my blog at that time. For the real Formal Progress Update, I will be sure to have everything required up and ready for viewing of both my classmates and instructors.
Log #9 (10/31-11/01/11)
Yesterday I worked on putting up all the drawings of my alternate solutions. This was a tedious but fairly simple task. It took a lot of time because the blog didn’t want to cooperate. Getting the pictures centered in their appropriate spot was fairly difficult and annoying. Today I worked on tuning up my blog. My blog had a few errors on it, some that couldn’t be fixed and some that I was able to fix. The font of my blog for some reason seems to be small but I cannot make it any greater; if I do its way too big. The beginning of this week was very important for my presentation but also annoying. Some things on Blogger seemed to not work and I don’t really know why they were designed that way.
Log #10 (11/2-3/11)
Yesterday I discussed the final drawings and model ideas with my group. We still had a few drawings to do involving the final solutions so I was in charge of two of them. I created sketches of the parts required in completing the task and I also thought about my model. For my model I am going to create the chosen solutions and demonstrate the wiring used in these solutions. Today I finished my final drawing. Combined with Rob, we now have our four final solutions drawn in two different ways. These drawings are very important not only for anyone viewing our Blog, but also for our group. Now that we have our solutions drawn, we have a concrete base to build off of.
Log #11 (11/14-15/11)
During these past two days I have had little to do because it is the close of the marking period. I had to ensure that my Formal Progress Update Poster was posted to my blog and that everything was correctly posted. I also checked my grades and regarded any concerns or problems that I had with them. There were a few issues that I want to deal with and finalize and hopefully have an improvement on my semester grade. These past two days have been frustrating for me because I don’t fully agree with some of the grades I was given.
Log #12 (11/21-23/11)
During this short week I focused on designing a newer model that physically showed an important component of my job as the electrical designer. For my model I will show how the electrical power can go from the output source to the specific operational component. I also worked on my calendar during these three days. Like last marking period, the calendar is a big part of the class. It is what keeps my group and me in check at all times. The calendar I created was more specific and more detailed than the one from Marking Period I. I also have it up and ready on my blog so it is easily viewable by the instructors. The calendar is going to be graded on the 30th of this month and I plan on getting an outstanding grade on it.
Marking Period 2
Marking Period 2
Log #13 (11/28-12/2/11)
During this week my group and I have worked on assembly and organization of our VEX Kit. We wanted to get more familiar with what we were actually using in the construction and design of our project so we started digging through the box. After some sorting out, learning and assembling we have gotten a great feel for our project. I also took a brief look at the electrical parts and read up on the various usages, power and setups.


4:1 Gear Ratio: Propulsion

Battery Pack and Charger

Progress By Close of November
Log #14 (12/4-6/11)
During these two days the group and I worked on categorizing and labeling all our materials. After a purchase by our very generous teacher, we were able to completely sort all the nuts, bolts, washers, metals, gears, treads and additional materials. Our kit is extremely neat and easily manageable. We then worked on more construction of our VEX Kit. We established a complete propulsion kit and fixed up some tweaks that make our VEX Robot a lot more functional.


Hull Plates

Our VEX Robotics Kit

Gear and Chain Parts

Bolts, Nuts, Screws and Washers
Log #15 (12/7-8/11)
The middle of this week we continued to assemble our VEX Robot. As expected, we ran into some roadblocks in design and had to fix them. These flaws were minor and easily fixed. I also did more research on gears and gear ratio. We jumped back to our original gear setup when I calculated that its gear ratio was superior to the high strength gear kit.


Slingshot Struts

Progress By Thursday the 8th
Log #16 (12/9//11)
Today was a day of electronics. My group and I worked on updating our logs and getting together information to bring to the Monmouth County Library. After compiling all the pictures I have taken into a document I was able to distribute them to my group members. As of now, our VEX Robot is almost completely done in its construction. There are a few minor parts and details that will need to be made to the VEX Robot. Overall, my group is moving at the speed of light and achieving greatness in our project. I am enjoying this project very much and I hope there is more excitement to come.

Arm and Camera Attached
Log #17 (12/12-16/11)
This week was a shortened week for me. I was absent from school on Tuesday and attended the Economics trip on Wednesday. In this three day week, I accomplished my Plan of Procedures, in list form. This was done after observing our VEX Robot and examining the website to see our full kit easily. My group and I also met with Rob Rubiano. He was very impressed with our VEX Robot and was a little shocked when he saw it was already built. He gave us some tidbits about floatation, weight and movement that will definitely be thought of in designing our final product. Overall, this week was very successful and a great opportunity to learn from someone with recent experience in the same exact project.
Log #18 (12/19-21/11)
This week I worked on putting the final touches on my materials list. A lot of the list was gathered off of the VEX Robotics site, the rest was created by my group and I.I drew my servo/motor in both 2D and 3D with dimensions. These drawings are fairly simple but are an accurate representation to what my job is to be completing. I took screenshots of each drawing and uploaded them to my blog. I then put any notes that I thought were necessary underneath the drawings. I also created my Electronic Assembly list. This list corresponds to any electronically engineer/designer interested in building our VEX Robot. It is a simple, accurate list that is easy to follow and allows for a successful replica of our VEX Robot. Overall, this week was very strenuous but I was able to get everything done.
Log #19 (1/2-3/12)
The beginning of this week we began programming the VEX Robot. Programming the robot takes a lot of trial and error. It also requires patience and a decent knowledge of how to program a VEX Robot. We also attached our last and final servo. This servo will be used to release the slingshot which will fire the Ping Pong ball through a hoop. We also took a Safety Test today. Everyone was required to get a 100 in order to work in the shop. This is very important to my group because we will be in and out of the shop especially when building the tank with Rob Sharkey. Overall, these two days were very productive and were a great start to the new year.
Log #20 (1/4-6/12)
This part of the week my group worked on experimentation of our VEX Robot. We began to wonder why we had certain things how they were. This lead us to manipulate and change various ideas. We began changing the arm (claw). We modified the arm so it was more powerful and did its job to a much farther extent (sink a boat). We also replaced the motor on the conveyer belt to a servo. By doing this, we are able to use this motor for a different thing which turned out to be the arm. After modifying a few things on our kit, we began to add a new servo on the back. This servo is going to be used for another arm (claw #2). Unlike the more powerful claw, this claw will be used to tow a friendly vessel. This week was primarily used to modify and experiment our VEX Robot. Overall, these three days were very beneficial in maximizing the success of our VEX Robot.

Modified Arm: Increase in Power

Modified Arm: Increase in Power
Log #21 (1/8-9/12)
The beginning of this week was slow for me. I had completed my Formal Mentor Report over the weekend and was caught up to date on everything else. Monday, I worked on posting my report to my blog. This was quite difficult but after some help from Nick Heins I was able to do it. Instead of posting the entire report to my blog, I created a google doc which allowed me to create a link of my report directly to my blog. This link is easily accessible and much more appropriate than reposting my entire report about my blog back onto my blog. Overall, I was very relaxed these past two days and really only worked on a few little things. I did some “blog cleaning” and some organizing and I’m ready to move onto my poster, presentation and mentor contacts!
Log #22 (1/10-13/12)
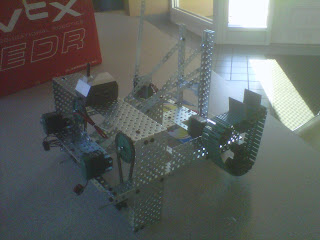
The end of this week was very productive. I was able to complete my mentor contacts for this marking period. I had about four of them which were face to face contacts. Although my mentors haven’t been a huge part of my project, I feel that their input this marking period will be much more substantial than last marking period.. I also gave a presentation with one of my group members, Nick Erickson. This was a very big deal for our group and our project because it was given to people of such high importance. We did a great job on the presentation and I hope everyone liked it!. I also took another four pictures of our VEX Robot up-to-date (orthographic, front, right side, and top views). These are the most recent photos of our VEX robot (see images below). As you can see, we still need to do something about the wires, floatation, the slingshot and tune up some servos. Overall, this week went great for my group and I.

Our VEX Robot Up-to-date: Isometric View


Our VEX Robot Up-to-date: Isometric View

Our VEX Robot Up-to-date: Left Side View

Our VEX Robot Up-to-date: Right Side View

Our VEX Robot Up-to-date: Front View
Log #23 (1/16-20/12)
This week was completely devoted to Formal Progress Update Presentations (no school on Monday). These presentations count for 30% of our MPII grade and are a very big part in the Systems Engineering II course. Not only do they count for a lot in the grade but they also are great in understanding our project to the fullest. My group and I did very well in our presentations. I thought we were very precise and accurate in the things we spoke about. I also liked to watch the other projects get presented. Although it became repetitive after a while, they were very informative and interesting. Overall, this week was a very important week for both our MPII grade and our understanding of the Systems Engineering II projects.
Log #24 (1/30-31/12)
The beginning of this week was work done strictly on the sling shot. Yesterday, we cut the PVC pipe required for the slingshot barrel. Since we are launching a ping pong ball, we cut a PVC pipe with about a 1.5” diameter down the center. This gave us a nice groove which allowed for the ball to slide easily up the pipe and be fired very accurately. Today, we worked on attaching and designing a servo and device to cut the string that holds the slingshot’s tension. Attaching the servo was very simple (same as all the other servos/motors). Creating and attaching the device that cuts the string is more difficult. We took apart a pair of scissors and attempted to attach one blade to the VEX kit and one to the servo. We planned on having it rotate about 90 degrees and smoothly cut the string. Unfortunately, the scissors are designed to work as scissors and are slightly concave. Getting an accurate and precise cut 100% of the time is very difficult. To fix this problem we plan on modifying our cutting device or brainstorming for a new design. Overall, these days have been very fun and productive because they not only work with a very important part of our VEX kit but they also are a non-VEX oriented design to our kit which is required in our final solution.


PVC Slingshot Prototype

Wooden Release - Functions Using Tension

Various Wooden Slingshot Releases
Marking Period 3
Log #25 (2/7/12)
Today was a great day for blogging and construction. I updated my calendar completely with not only the necessary MPIII dates but also additional ones to give me a constant guideline of what to complete. In the shop, we had a big change; we decided to modify our slingshot to a larger PVC pipe that also has a bigger diameter. Launching the Ping Pong ball will now use the elastic strings attached to the PVC pipe itself. We removed some support under the PVC pipe because it was unnecessary and adding unneeded weight. We also added the pouch on the elastic string. Some testing of firing objects was done using wooden dowels. This pouch is not a normal slingshot pouch but works the same way. It is created from a rounded piece of PVC that will allow the ball to be pushed further and more accurately. It will also not let the string slip under the ball and have a misfire. Overall, it was a great day for blogging and constructing where Nick and I completed our calendars and almost finished an essential part of our VEX Kit.


PVC Slinghshot Using Elastic Rubber From The VEX Kit

Wooden Dowels Used In Slingshot Testing

PVC Pouch
Log #26 (2/8-10/12)
The end of this week I worked on revising the slingshot device. We began to completely finish the construction of the newer PVC pipe and also began to create a newer pouch which was bigger and used better intuition in its design. The pouch will now be attached by weaving the elastic rubber through it. This made it much easier to use and setup. I also had to help Tess with taking pictures and getting her calendar on her blog. This took some time up from my construction but that’s okay. I helped Rob with constructing his model tank. We worked on putting glue on the liner and gluing it down. After gluing it down, his model looked very nice and almost ready to go. It just needs one more layer of liner and then it will be ok. To ensure that the glue holds well, we clamped down pieces of wood to the sides. This pressed the glue, wood and liner together well. We also put bricks on the bottom to press that down to the wood. Overall, this week was very effective in fixing up little problems and helping out not only my group members but other groups as well.
Log #27 (2/14-15/12)
These past two days have been crucial to the development of our slingshot. After doing tests with last weeks prototype we noticed that there could be a better solution to creating a successful slingshot. We decided to go with a PVC pipe with a larger diameter. This will make the firing more simple and easier to work with. We also created a more simple design for the release for the slingshot. Instead of having the string be released under a piece of wood it will now slide over the piece of wood with a 1/4” wooden dowel at the top. This will be more efficient and plausible for our task. Some test fires were taken with a duct tape ball which fired fairly well. To make the slingshot work successfully, we had to attach this piece of wood directly to our VEX kit. This was done by drilling a small hole in the piece of wood and then attaching it to our VEX kit using a larger, ½” screw . In creating, modifying, and testing all these procedures we also wore safety goggles. This is very important to ensure safety from saw dust, PVC dust and debris. The goggles were especially important because of the high usage of tools we undergo week by week. These past two days we have used the power sander, band saw, scroll saw, power drill and hot glue gun. These have all been vital in the construction of our project. Overall, the week so far has been very successful in the steps of constructing and testing our slingshot.
Log #28 (2/16-17/12)
Log #28 (2/16-17/12)
The rest of this week Nick and I worked on designing a better pouch. The pouch were first used was too large and awkwardly shaped. We figured we could make a smoother one that allowed for better mobility and stability. I also thought of weaving the elastic through it. This not only made firing much more accurate and precise but also much easier to handle. Creating this device we used the circle sander and hack saw. The past few days has been purely innovating our original ideas. After doing tests and really putting the solution to work, we see that there are flaws and definitely better options to go with. This new pouch works very well because it fits perfectly in our PVC pipe. Overall, we worked on designing and innovating an original idea and so far are on the right track.
Log #29 (2/20-21/12)
After doing some test shots with the pouch created last week we realized that the pouch was pushing the ball well but tended to pull up. The ball would not always travel the same as the previous shot and also seemed to get pulled up instead of shot out. To fix this problem, we designed a totally different pouch. This pouch wasn’t really a pouch anymore rather it was a piece of PVC that allowed for string to be looped through on both the bottom and the top. This made it so that the device could not spin, twist or interfere with shooting the ball. We used the power drill to do this which was quick and effective. Once the holes were made, we simply tied the string in place. Once this was in set in the PVC tubing, we tied the elastic part of the slingshot to the string. By doing this, we were able to still have a very powerful slingshot and also keep the stability and accuracy that we really need. Overall, this week is off to a great start and our project is looking better than ever.
Log #30 (2/22-24/12)
After creating the base and firing device of the slingshot we now needed a release that worked effectively. The release is very tricky because we only have one servo to use to trigger it. This gives us only a little bit of leeway because we need something that will slide off the piece of wood by a tap of a servo. Servos are only so strong and make this very tricky to work with. We need a tiny groove to hold the releasing string but it cant be too small or it will slide off before we can trigger it. If it is too big, it will never slide off and therefore our slingshot won’t be able to fire. These past few days we have been going through many different ideas and noticing that they all seem to work differently. We also were using different variations of wood which made it more tricky because some were smooth and some were not. The densities of the wood also varied making some break if the notch was too deep. In some cases, this made certain types of wood not plausible to use because they would break too easily. Overall, the end of this week consisted of many tests and different ideas that ultimately need even more improving.
Log #31 (2/27-29/12)
After a pretty frustrating week in creating a successful release we moved on to fully completing the firing mechanism. Our new pouch device is by far our best solution. It stays deep inside the barrel which lets it hit the ball evenly and with sufficient power. To complete this little device, we needed to create something that would hold on to the release device. To do this, we drilled two more holes in the pouch device. This allowed us to tie string to it and then be able to tie strings to a ¼” wooden dowel. By using a round object like the dowell, the release will be smooth and work everytime. In the past few weeks of construction this has been a big problem and it is finally overcome by something very simple and reliable. Overall, Nick and I are very pleased in the work we’ve done these past few days because we overcame a big problem in our slingshot challenge.
Log #32 (3/1-2/12)
The past few weeks Nick and I have been working very hard to get this slingshot ready to go. We are tired of the VEX Kit and figured it was time to put some work in (along with Rob) on the tank. The tank’s size was changed from 10’ to 8’. This saved time, lumber and many other materials. The first thing we needed to do was measure out the wood. Every piece of wood must be the same size and in good enough condition to use. The tank has to be a square so no pieces can overlap or underlap. Measuring the wood was awkward because the pieces were pretty heavy and large. We measured each one individually to get a more accurate sizing. After measuring all the pieces we then brainstormed on what piece woud go where. Some pieces were curved or had a few knots so we had to be certain pieces in certain places. Overall, working with the wood has been very fun so far, and a great break from VEX!
Log #33 (3/5-6/12)
After all the excitement of working with such big materials, our group headed down to the lab very quick. Today was the day were we would begin to cut. In order to cut these planks of wood we needed to use a circular saw. Rob, Nick and I have never used the circular saw before so we observed a demonstration from Mr. Alfonse. There were four pieces of wood to be cut so we each were able to cut one piece. The circular saw cuts only in straight lines and can either cut on a 45 degree angle or on a flat surface. The saw had a guard rail which made it safe for newcomers like my group. Cutting each piece was quick and easy. It required a stable hand and a smooth force behind it. This ensured a good, clean cut. We then layed down the four planks of wood in a square shape. After choosing which piece would be inside and which would be outside we were ready to move on. The pieces layed out very well and now required screws. Screwing the pieces of wood together required 2” screws. Unfortunately, we used a very powerful drill and seemed to strip a few screws. This made it very difficult to fix any mistakes because the screws were never coming out. After using about 14 screws, our frame was connected and stable. Unfortunately, the frame was very awkward to store and heavy. For the day, we leaned it up against the metal shelves and tied them down. Overall, our group is doing very well in the construction of the tank and can’t wait to continue!
Log #34 (3/7-9/12)
These next three days we worked on putting the plywood on. The plywood was the bottom of the frame and was what would hold the liner and water. We used two sheets of plywood to lay over the basic frame. After matching it up perfectly, we then screwed them in using 1 and ¼” screws. A screw was placed about every 6” resulting in the use of about 64 screws. Putting the plywood on was very simple especially because we had one person lining up the screws, one person putting the screws in and one person supplying the screws. Next, we had to cut out the liner needed to cover the entire tank. To do this, we were required to cut two separate pieces. We then used chalk line to get a more exact measurement. The chalk line was easy to use for measuring and guarneteed Rob and I a straight line. After marking out the two liners, we then cut them out using exacto knives over a wooden plank. These cuts were very accurate and worked very well. We then layed them in the tank and noticed that they were a great fit. Overall, it was a great week and only have a few things left to do in construction.
Log #35 (3/12-13/12)
These two days we worked on stapling and gluing down the liner. To ensure that the liner remained in place we stapled and glued it. Since the staples are very strong alone, we only glued about half the tank. This would ensure that the inner liner would not be falling out if the tank was flipped over. Stapling it was the most important. A staple was put about every four inches. This worked well because it didn’t put too much pressure on certain parts of the liner and it was stronger than sufficient requirements. Overall, these two steps were some the last before the tank was complete.
Log #36 (3/14-16/12)
The end of this week Rob, Nick and I worked on completing the tank. All that was left was sealing the corners. Once they were dry, we were able to test them. All the corners except one were sealed successfully. We simply adding more seal to the one corner and retested it. Once we saw that all the corners and seams were successfully sealed we moved on. Now that the tank was built in only a week of construction we could focus on building the parts for the challenges and finishing our VEX robot. After a hiatus from VEX, Nick and I went back ready to work. We finally figured out our final solution to the slingshot. Instead of pushing up on a wooden release, we decided to push down. We constructed an arm from the servo that would push a release down allowing ther string to pop up. This string is attached to the pouch and elastic that will propell the ping pong ball out of the PVC tubing. After a lot of hardwork on mastering the slingshot, it is finally over. Only the propulsion, floatation and waterproofing remains for Nick and I! Overall, this week was great; we completed all the necessary construction for the tank and finished everything for the slingshot.
Log #37 (3/19-20/12)
Today Nick and I worked on testing our slingshot. We took about 15 test fires; most of which were very similar and tended to land in the same area. We noticed that some shots were getting interfered by either the elastic or the piping of the PVC. We aren’t exactly sure to what is causing the misfires but it only happens every 10 shots or so.We also contemplated adding wheels to our VEX Robot and changing it to a land challenge but since we are so deep in a group-wide project we can’t turn back now. Taking the test fires was interesting because we got to see where each ping pong ball would land. For the most part, the shots tended to land within six inches of eachother except the occasionally fluke that didn’t go very far. Overall, these two days were very successful because it allowed us to see how our VEX Robotics will perform in the real challenge.
Log #38 (3/21-23/12)
This week was an easy work for the group. I got caught up on my logs and just need to upload some pictures and they will be 100 percent. We also watched the Herbarium presentations. Their presentations went very well and displayed our school very nicely. They also set a good example for us to guide off of. For our presentation I will be the person to intro our project and close our project. The construction will be talked about by Rob and Nick because that is their actual design brief. We also did some work on our presentation. Everything was organized very well and all we need to do is complete a powerpoint. We are creating a powerpoint because it binds our groups together very well and keeps our presentation fluent. Monday is our presentation and it is a big day for us. Our presentation will go very well and luckily it is as a group this time. This makes covering the main topics easier and more realistic to viewers. Overall, the end of this week was used to prepare our presentation, touch up logs and upload the last of our pictures.
Marking Period 4
Marking Period 4
Log #39 (4/16/12)
There are only a few steps left in finalizing our VEX Robotics project. They should not take longer than three weeks but are not to be taken lightly. Although they are fairly simply tasks, they are crucial in the fuction and survival of our robot. Waterproofing, floatation and propulsion. Oddly enough, the tasks that remain are only relevant to water related objectives. For floatation we need to purchase high-density foam and test the amount we need. In order to test the foam and make sure our VEX robot floats we will undergo preliminary tests. These tests have already been done and show how much 1 cubic inch of floam will keep above the water. After knowing this calculation we will weigh our VEX robot and begin to shape the foam properly. Weight will then be applied to the foam in a small water-filled tank. It will also be layed out to match the weight distribution of our robot. There will be a lot more math involved but since we are new to buoyancy and stability, our calculations will be mostly backed by testing done by my group and I. Waterproofing the kit is also vital in the tasks at hand. We are dealing with electricity and water. As you know, the two do not go together very well. In order to make sure the electronics are safe from water damage we must water proof them. This will be done by plastic bags and clear, water-resistant cement. We will place the servos, motors and logic system inside plastic bags. The screws will then be sealed to ensure the parts are safe from any water whether it is splashing or submerging (just in case). This step is actually fairly simple and only requires tedious work. We will need to wait for the cement to dry before testing it. This takes about 5-10 minutes giving us enough time to secure a few pieces each working day. We have already tested one bag with four screw holes in it; this design worked perfectly in both splash tests and submerging tests. The last thing that needs to be completed to finalize our VEX robot is the propulsion. Our propulsion system is all setup and ready to go. Because the testing tank is not very deep we might need to raise up our propellers 1”-1 ½”. At this point we are only concerned with what propellers to buy. We are going to buy propellers that are made for RC boats and NOT for planes, computers etc. We plan on buying two sets of propellers; 3” diameter propellers and 2” propellers. This will let us mess around which what size would be optimal. Because we have little to no room on both the sides and bottom we cannot use propellers greater than 3”. Although we want speed and control we are not sure if the biggest size is necessary for our challenges. Once we purchase the propellers we will test to see which one is capable of moving the VEX robot most safely and efficiently. Any problems with touching the VEX robot, or possibly touching the bottom of the tank will rule that propeller out. These next few weeks will be a bit of cramming but nothing we can’t handle. My group works very hard in the lab and I plan on completing these three tasks with time to spare and time to modify or enhance various parts.
Log #40 (5/13/12)
Tomorrow night is a big night
for everyone. Every single senior involved in a project both oceanography kids
and systems kids will have a chance to show off their projects. Every
group/person has created a poster that shows their progress over the entire
year. My group has two posters demonstrating both the tank we created and the
VEX Robot we designed and constructed. We are going to have to perform our
challenges in the tank in front of a decent sized audience. We hope it works
out well and people enjoy it very much. Another VEX Robotics group will also do
their performance. Their VEX Robot is mreo simple than ours but moves much more
swiftly in the water. Our robots are very different and hopefully together will
be able to capture the attention of parents, students and soon-to-be seniors.
Overall, our project is ready to be put to the test and I am excited to see the
Seniors and all their projects.
Log #41 (5/21/12)
Last week had our Senior
Project Night. It was very awesome to see all the seniors with all the
different projects. It seemed that the VEX Robotics were the big hit that
night. People enjoyed seeing something actually move and function rather than
read a poster or powerpoint. We also completed our challenges, they went very
well for both our group and the other VEX team. Our first run was a little
sloppy because it was our first time doing the competition. After a few minutes
we were ready to go and completed the objectives in under five minutes. Both
the groups were able to do it. Overall, it was a great night to show our
projects and also see the successes everyone has made over the year.
Log #42 (6/1/12)
The year’s end is fast
approaching. All that is left to do is my final and prepare our project to be
showed in the Monmouth County Library. To show off our projects we need to make
a nice looking showcase for it. We are going to create a wave-like piece of
foam to mount our VEX Robot on. We are then going to attach the ping pong ball
using a fishing line to show it in motion. This will hopefully appeal to
younger kids and get their interest as they grow older. After we set up the
ping pong ball we then will place the buoy on the conveyor belt. Both the
low-powered arm and high-powered arm are going to be placed next to their
assigned boats. Hopefully, people will understand that these arms would
normally be in motion for both saving a friendly vessel and sinking an enemy
vessel. Overall, the year has been
fulfilling and fantastic and I really enjoyed working with my teammates.
AD,
ReplyDeleteGood information- and current. Keep this up!
Mr. A
ad,
ReplyDeleteI see no testing???? Where are your alternate solutions? Together this is worth 15% of your grade. Both of these items will be graded by close of business on the 20th.
Mr. Alfonse
all items are past due-we have just been nice- maybe to nice.
AD,
ReplyDeleteYour log entries are fine- sorry for some of the frustrations of entering material on the blog- stick with it!
I do not see any calendar and that is 1/3 of the grade in this section???
As a result I must post a 60% for this part of your grade.
Please review blog and handouts twice a week to avoid situations like this.
If I did make a mistake and that calendar is here I will cheerfully change your grade.
DA
ad,
ReplyDeleteWell thought out log...
da
AD,
ReplyDeleteGood job on logs- Now that 3rd quarter is upon us its time to rock and roll and geett this "puppy" working and floating.
DA
you are the king of blogs- really.